Knowing how to pack a home studio for moving means treating it less like a room full of furniture and more like a room full of instruments, all of which are sensitive to shock, humidity, and pressure changes in different ways. A home studio might hold a few thousand dollars in audio interfaces and monitors, a guitar collection, a synth or two, and a tangle of cables that only makes sense to the person who built it. None of that survives a move well if it gets tossed into a box the same way you'd pack a bookshelf.
This guide walks through the order to pack in, what needs specialty handling, and how to keep your setup from turning into a rebuild project when you arrive. If your studio shares space with other high-value rooms in the house, our professional packing services can handle the whole job so nothing gets rushed.
What Should You Pack First in a Home Studio?
Start with anything you are not actively using this week: extra cables, spare gear, reference books, and decor. Save your main workstation, primary instrument, and monitors for last so the room stays usable right up until moving day.
Home studios tend to accumulate gear in layers over the years, and a lot of that gear is dormant. Old audio interfaces, backup mics, unused pedals, and cable bundles you haven't touched since a project two years ago are safe to box up weeks in advance. Doing this first also forces you to see what you actually own, which matters because studios are notorious for hidden fragile items buried in drawers.
Do an Honest Gear Inventory
Walk the room and list every piece of equipment with a serial number or resale value: interfaces, monitors, mixers, synths, mics, and instruments. This list becomes your insurance reference if anything is lost or damaged, and it also tells you which items are worth buying dedicated cases for versus wrapping in moving blankets.
How Do You Pack Studio Monitors and Speakers for Moving?
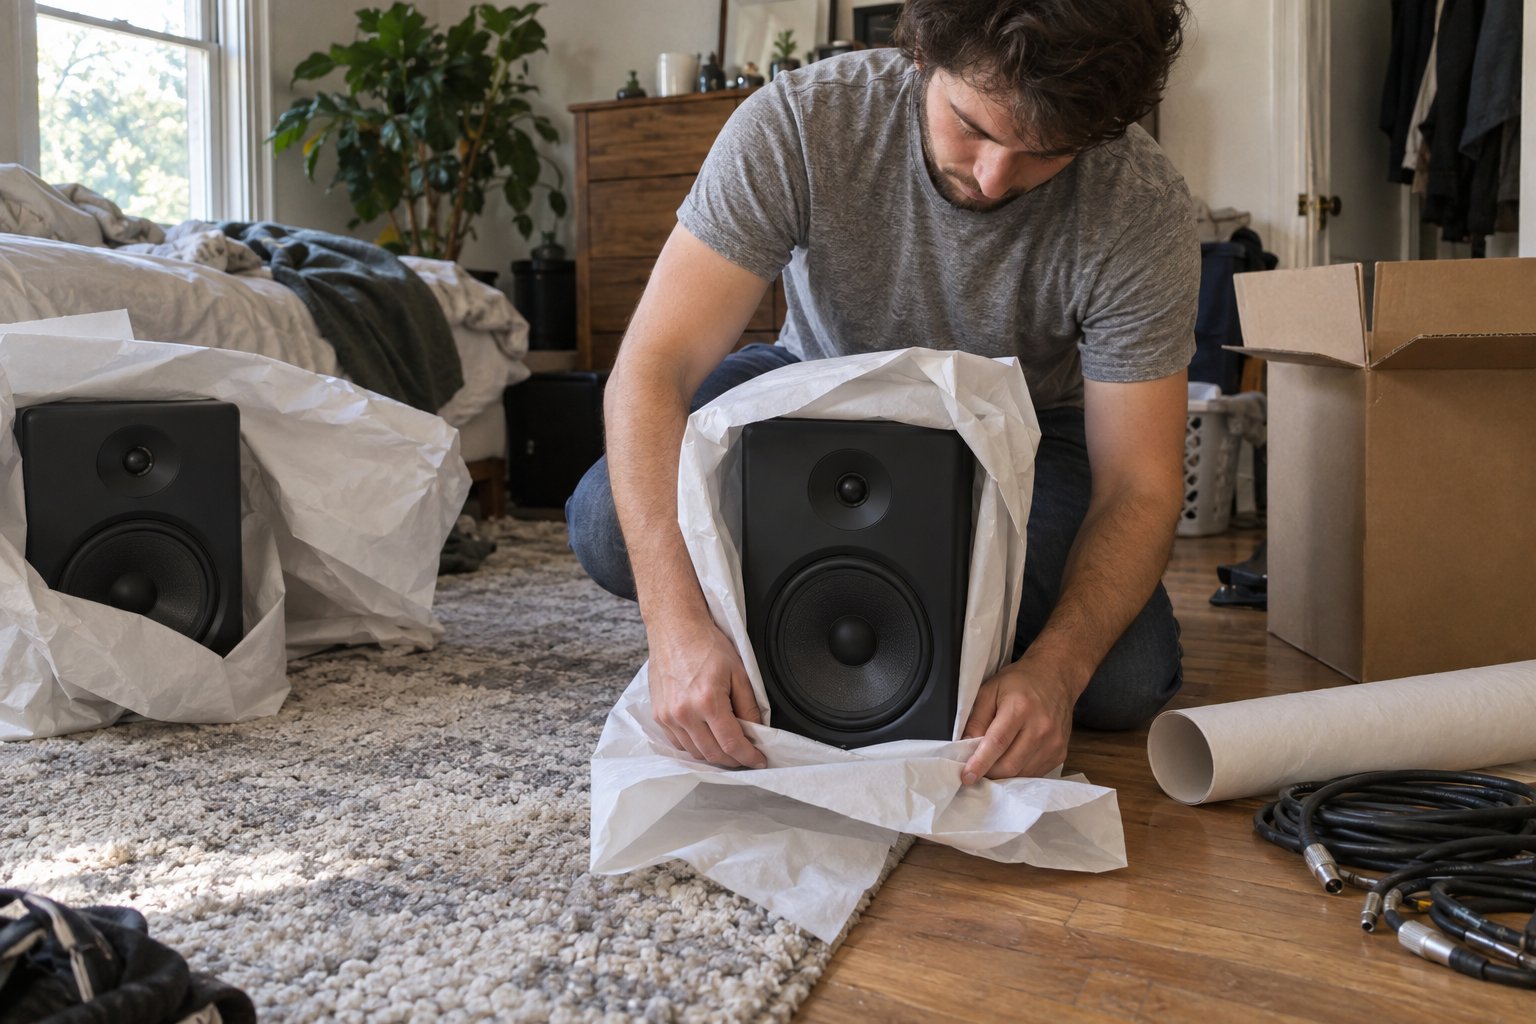
Studio monitors need their original boxes if you kept them, or a snug double-box setup with at least two inches of padding on every side. The drivers and internal electronics are sensitive to both impact and to being carried at odd angles for long periods, so orientation matters as much as cushioning.
If you didn't keep the factory packaging, wrap each monitor in a moving blanket, then place it in a box sized so it can't shift, filling gaps with packing paper rather than loose fill that can settle during transit. Keep monitors upright in the same orientation they sit on your desk. Laying them on their backs or sides for extended periods can stress the driver mounts. Disconnect and coil cables separately rather than leaving them attached, since a taut cable can pull a connector loose during loading.
Protecting Instruments, Synths, and Outboard Gear
Instruments and synths need individual protection and climate awareness, not just a sturdy box. Guitars and basses should travel in hard cases when possible, synths and keyboards need their keys protected from pressure, and anything with tubes or delicate internal wiring needs to be padded like the fragile electronics it is.
For guitars without a hard case, loosen the strings slightly to reduce tension changes from temperature swings, wrap the body in a moving blanket, and stand cases upright rather than stacking anything on top. Keyboards and synths should be wrapped with the keys facing up if boxed, and never wrapped so tightly that pressure sits directly on the keybed. Tube amps and preamps are the most fragile items in most studios: pack them with the tubes still installed unless you can remove and individually wrap them, since loose tubes rattling inside a chassis during transit are a common cause of failure.
Handling Vintage or High-Value Gear
If your studio includes vintage synths, rare mics, or anything irreplaceable, consider having it moved as a specialty item rather than boxed with the rest of the room. Our specialty item moving service is built for exactly this kind of high-value, delicate equipment that a standard box and blanket approach isn't enough to protect.
How to Pack Cables, Patch Bays, and Small Accessories
Cables should be coiled loosely, labeled by function, and grouped by the piece of equipment they belong to, not thrown into one giant bin. A home studio can easily have fifty or more cables, and untangling an unsorted box of them later can cost you a full afternoon you didn't budget for.
Use the over-under coiling method to avoid kinks, then secure each coil with a velcro strap rather than tape, which leaves residue on cable jackets over time. Bag small connectors, adapters, and patch cables by category (XLR, TRS, MIDI, power) inside labeled zip bags, then group those bags into one clearly marked box. Photograph the back of any patch bay or rack unit before disconnecting it. That photo will save you far more time on setup day than trying to remember which cable went where.
Should You Rack-Mount Gear Before or After the Move?
Leave rack-mounted gear secured in its rack case for the move rather than pulling everything loose. A rack case is already built to cushion and stabilize equipment, and disassembling a rack usually creates more risk of lost screws and mismatched cables than it prevents.
If your rack case has wheels and a lid, treat it like a piece of luggage: latch it, tape over any loose knobs or switches that could get bumped in transit, and keep it upright during loading. If gear isn't in a case, wrap the entire rack unit as one piece with moving blankets rather than removing individual components, and label which rack slot each piece came from so reassembly at the new place goes quickly.
Setting Up Your Studio in the New Space
Unpack in reverse order: cables and patch bays first so you can reference your photos while everything is still fresh, then rack gear, then monitors, then instruments last so they aren't sitting exposed while you're still moving boxes around. Getting your room treatment and monitor placement right again can take longer than the unpacking itself, so budget time for that separately from the physical move.
If the new space needs furniture placed or heavy gear positioned before you can even start rewiring, our furniture assembly and disassembly services can handle desks, racks, and stands so you're not doing that on top of everything else. And if you're planning the studio move as part of a larger household relocation, get in touch early so we can plan around your gear's specific handling needs.
Get a moving quote before your move date so we can flag any specialty handling your studio setup needs ahead of time.
Frequently Asked Questions
Can movers transport studio monitors and speakers safely?
Yes, as long as they're properly boxed and cushioned. Movers can transport studio monitors safely when they're packed upright with adequate padding, ideally in their original boxes or a snug double-box setup, and clearly labeled as fragile electronics.
Do I need to remove tubes from a tube amp before moving it?
It depends on the amp. If you can safely access and individually wrap the tubes, removing them reduces the risk of internal rattling. If you can't easily remove them, pad the amp heavily and keep it upright so the tubes stay seated in their sockets during transit.
How do I keep my studio cables organized during a move?
Coil each cable using the over-under method, secure it with a velcro strap, and group cables by function or by the piece of gear they connect to. Label the bags or boxes clearly so setup at the new place doesn't turn into a guessing game.
Is it safe to pack a keyboard or synth in a regular moving box?
A regular box works if it's sized close to the instrument and padded so the keys don't bear any pressure. For weighted keyboards or vintage synths, a hard case or specialty handling is safer given the cost of repairing internal key mechanisms.
Should I back up my studio computer and audio files before moving?
Yes. Even with careful packing, drives and computers can be jostled in transit. Backing up your projects and samples to an external drive or cloud storage beforehand protects your work regardless of what happens to the hardware.
Knowing how to pack a home studio for moving means treating it less like a room full of furniture and more like a room full of instruments, all of which are sensitive to shock, humidity, and pressure changes in different ways. A home studio might hold a few thousand dollars in audio interfaces and monitors, a guitar collection, a synth or two, and a tangle of cables that only makes sense to the person who built it. None of that survives a move well if it gets tossed into a box the same way you'd pack a bookshelf.
This guide walks through the order to pack in, what needs specialty handling, and how to keep your setup from turning into a rebuild project when you arrive. If your studio shares space with other high-value rooms in the house, our professional packing services can handle the whole job so nothing gets rushed.
What Should You Pack First in a Home Studio?
Start with anything you are not actively using this week: extra cables, spare gear, reference books, and decor. Save your main workstation, primary instrument, and monitors for last so the room stays usable right up until moving day.
Home studios tend to accumulate gear in layers over the years, and a lot of that gear is dormant. Old audio interfaces, backup mics, unused pedals, and cable bundles you haven't touched since a project two years ago are safe to box up weeks in advance. Doing this first also forces you to see what you actually own, which matters because studios are notorious for hidden fragile items buried in drawers.
Do an Honest Gear Inventory
Walk the room and list every piece of equipment with a serial number or resale value: interfaces, monitors, mixers, synths, mics, and instruments. This list becomes your insurance reference if anything is lost or damaged, and it also tells you which items are worth buying dedicated cases for versus wrapping in moving blankets.
How Do You Pack Studio Monitors and Speakers for Moving?
Studio monitors need their original boxes if you kept them, or a snug double-box setup with at least two inches of padding on every side. The drivers and internal electronics are sensitive to both impact and to being carried at odd angles for long periods, so orientation matters as much as cushioning.
If you didn't keep the factory packaging, wrap each monitor in a moving blanket, then place it in a box sized so it can't shift, filling gaps with packing paper rather than loose fill that can settle during transit. Keep monitors upright in the same orientation they sit on your desk. Laying them on their backs or sides for extended periods can stress the driver mounts. Disconnect and coil cables separately rather than leaving them attached, since a taut cable can pull a connector loose during loading.
Protecting Instruments, Synths, and Outboard Gear
Instruments and synths need individual protection and climate awareness, not just a sturdy box. Guitars and basses should travel in hard cases when possible, synths and keyboards need their keys protected from pressure, and anything with tubes or delicate internal wiring needs to be padded like the fragile electronics it is.
For guitars without a hard case, loosen the strings slightly to reduce tension changes from temperature swings, wrap the body in a moving blanket, and stand cases upright rather than stacking anything on top. Keyboards and synths should be wrapped with the keys facing up if boxed, and never wrapped so tightly that pressure sits directly on the keybed. Tube amps and preamps are the most fragile items in most studios: pack them with the tubes still installed unless you can remove and individually wrap them, since loose tubes rattling inside a chassis during transit are a common cause of failure.
Handling Vintage or High-Value Gear
If your studio includes vintage synths, rare mics, or anything irreplaceable, consider having it moved as a specialty item rather than boxed with the rest of the room. Our specialty item moving service is built for exactly this kind of high-value, delicate equipment that a standard box and blanket approach isn't enough to protect.
How to Pack Cables, Patch Bays, and Small Accessories
Cables should be coiled loosely, labeled by function, and grouped by the piece of equipment they belong to, not thrown into one giant bin. A home studio can easily have fifty or more cables, and untangling an unsorted box of them later can cost you a full afternoon you didn't budget for.
Use the over-under coiling method to avoid kinks, then secure each coil with a velcro strap rather than tape, which leaves residue on cable jackets over time. Bag small connectors, adapters, and patch cables by category (XLR, TRS, MIDI, power) inside labeled zip bags, then group those bags into one clearly marked box. Photograph the back of any patch bay or rack unit before disconnecting it. That photo will save you far more time on setup day than trying to remember which cable went where.
Should You Rack-Mount Gear Before or After the Move?
Leave rack-mounted gear secured in its rack case for the move rather than pulling everything loose. A rack case is already built to cushion and stabilize equipment, and disassembling a rack usually creates more risk of lost screws and mismatched cables than it prevents.
If your rack case has wheels and a lid, treat it like a piece of luggage: latch it, tape over any loose knobs or switches that could get bumped in transit, and keep it upright during loading. If gear isn't in a case, wrap the entire rack unit as one piece with moving blankets rather than removing individual components, and label which rack slot each piece came from so reassembly at the new place goes quickly.
Setting Up Your Studio in the New Space
Unpack in reverse order: cables and patch bays first so you can reference your photos while everything is still fresh, then rack gear, then monitors, then instruments last so they aren't sitting exposed while you're still moving boxes around. Getting your room treatment and monitor placement right again can take longer than the unpacking itself, so budget time for that separately from the physical move.
If the new space needs furniture placed or heavy gear positioned before you can even start rewiring, our furniture assembly and disassembly services can handle desks, racks, and stands so you're not doing that on top of everything else. And if you're planning the studio move as part of a larger household relocation, get in touch early so we can plan around your gear's specific handling needs.
Get a moving quote before your move date so we can flag any specialty handling your studio setup needs ahead of time.
Have Questions About Your Move?
Can movers transport studio monitors and speakers safely?
Yes, as long as they're properly boxed and cushioned. Movers can transport studio monitors safely when they're packed upright with adequate padding, ideally in their original boxes or a snug double-box setup, and clearly labeled as fragile electronics.
Do I need to remove tubes from a tube amp before moving it?
It depends on the amp. If you can safely access and individually wrap the tubes, removing them reduces the risk of internal rattling. If you can't easily remove them, pad the amp heavily and keep it upright so the tubes stay seated in their sockets during transit.
How do I keep my studio cables organized during a move?
Coil each cable using the over-under method, secure it with a velcro strap, and group cables by function or by the piece of gear they connect to. Label the bags or boxes clearly so setup at the new place doesn't turn into a guessing game.
Is it safe to pack a keyboard or synth in a regular moving box?
A regular box works if it's sized close to the instrument and padded so the keys don't bear any pressure. For weighted keyboards or vintage synths, a hard case or specialty handling is safer given the cost of repairing internal key mechanisms.
Should I back up my studio computer and audio files before moving?
Yes. Even with careful packing, drives and computers can be jostled in transit. Backing up your projects and samples to an external drive or cloud storage beforehand protects your work regardless of what happens to the hardware.

